Skip to content
WebChat AI
HomeFeaturesHow it worksIntegrationsPricingDocs
WebChat AI

Build intelligent AI assistants trained on your website content.

Connect with us

Product

  • Features
  • How it works
  • Integrations
  • Pricing
  • Security

Resources

  • Documentation
  • API reference

Legal

  • Privacy Policy
  • Terms of Service

© 2026 WebChat AI. All rights reserved.

Get Started
OverviewQuickstart
Knowledge sourcesFile uploadsRAG & grounding
EmbedCustomizationConfigurationTesting
ConversationsAnalytics & usage
API referenceSecurityTroubleshooting
Changelog

Ready to launch?

Get Started Free
DocsQuickstart

Build your first WebChat AI assistant

Go from raw website content or standalone documents to a live, grounded AI assistant on your website in 7 steps.

01 Account→02 Source→03 Ingest→04 Customize→05 Test→06 Deploy→07 Monitor

What you'll need

  • A WebChat AI account (Free tier includes 1 website and 1,000 monthly messages).
  • Either a public website URL, or documents in PDF, DOCX, Markdown, or plain text format.
  • Access to edit the HTML of your website where you wish to embed the assistant.
01

Create your account

Sign up and open your workspace dashboard.

Navigate to Sign Up. Enter your name, email, and password. Complete email verification if prompted, then log in to reach your workspace overview.
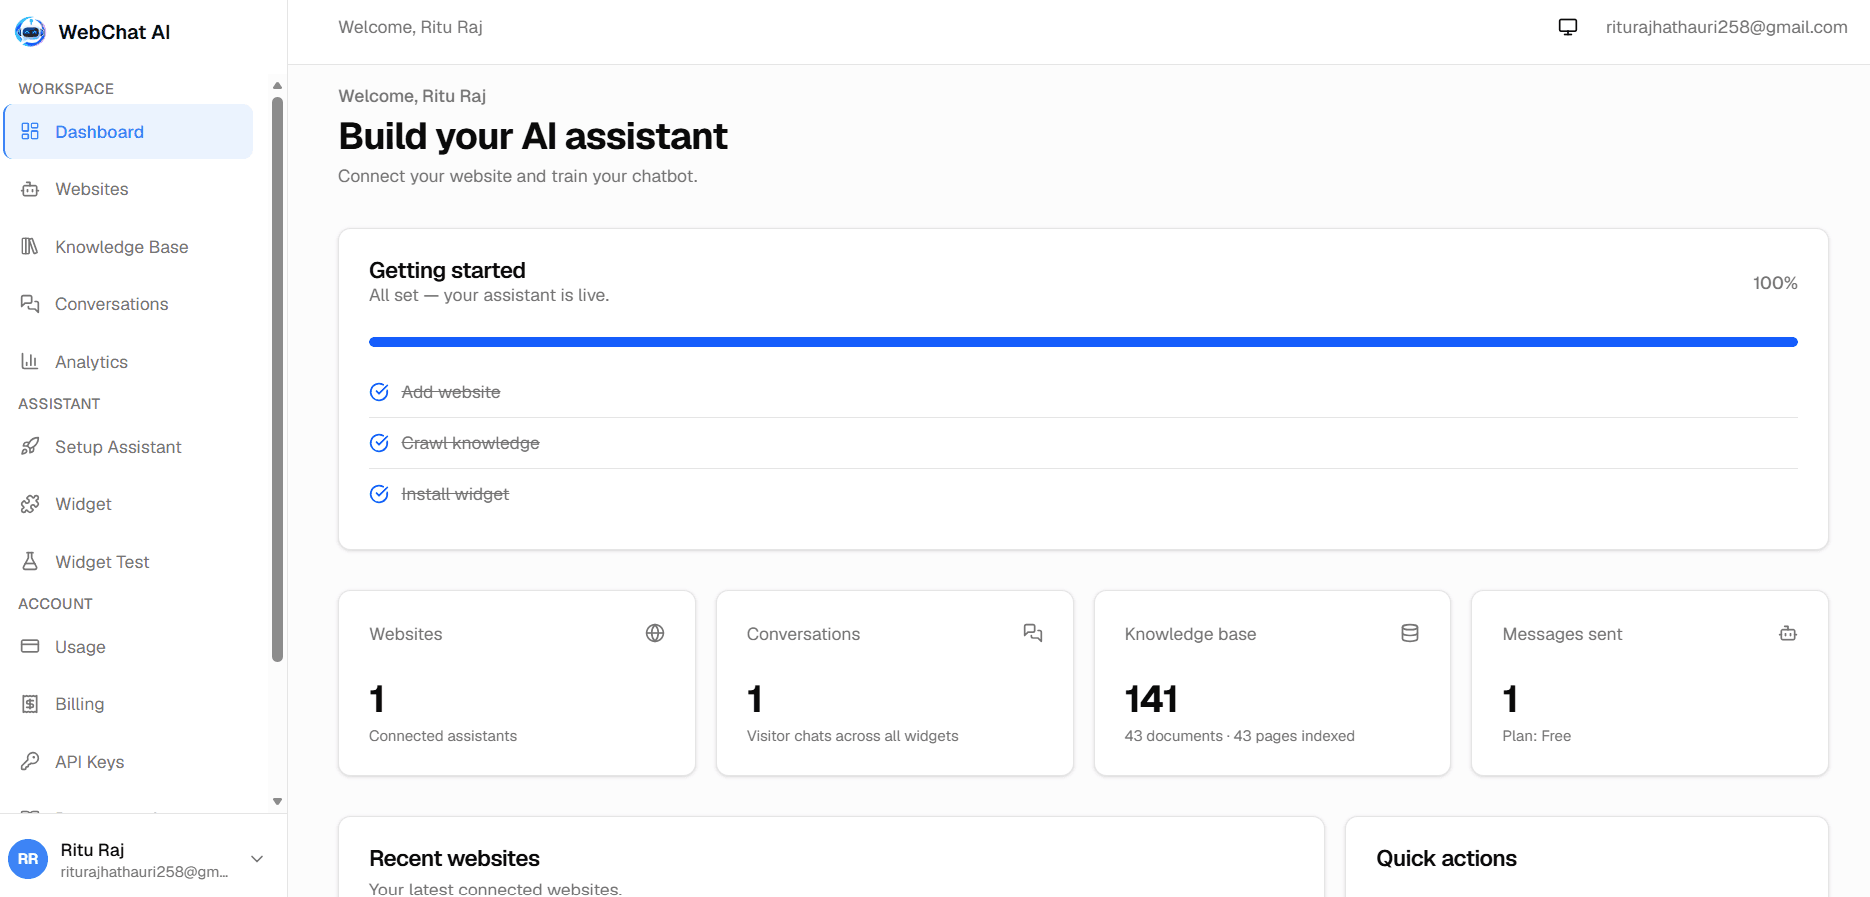
WebChat AI Workspace Dashboard
The WebChat AI dashboard showing websites, knowledge status, and quick links.
02

Choose your knowledge source mode

WebChat AI supports websites, upload-only chatbots, and mixed sources.

In your dashboard, click the Add website button in the top right corner. Select the source mode that fits your project:

Website

Best when your documentation, product catalog, or FAQs already live on a public site.

Requires URL

Documents

Best for creating a chatbot strictly from files (PDF, DOCX, MD, TXT) without a public site.

No URL required

Mixed

Combines crawled website pages with proprietary manual file uploads in one corpus.

URL + File Uploads
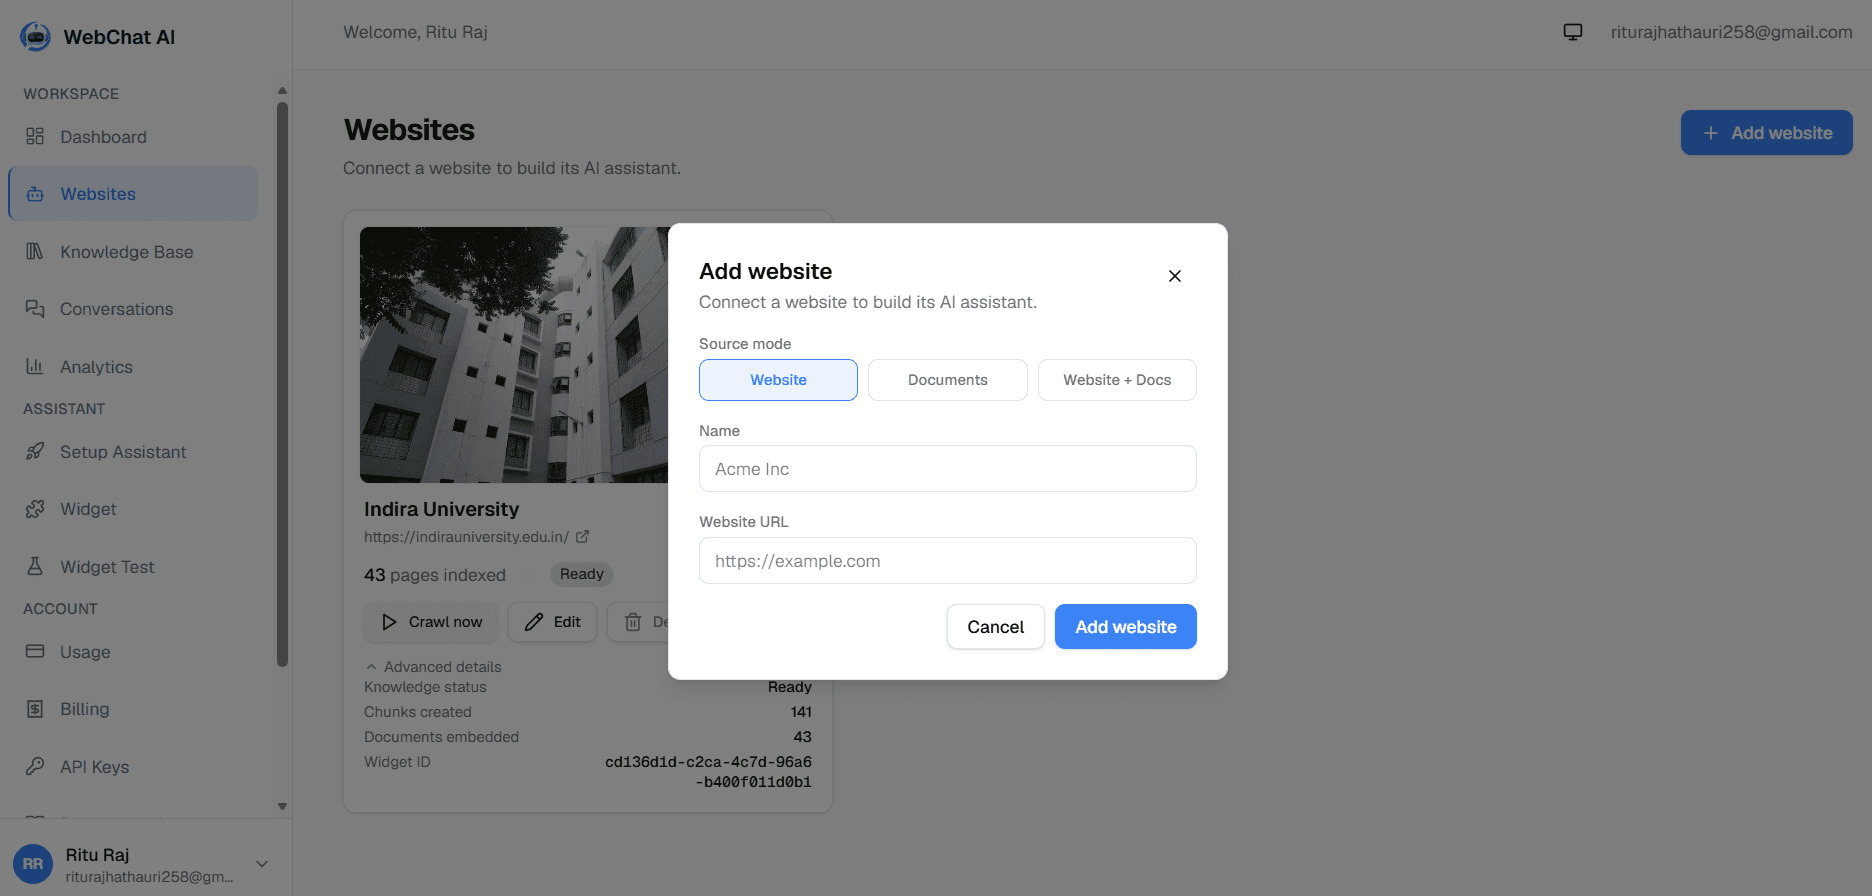
Source Selection Modal in WebChat AI
Source Mode selection: Website, Documents, or Website + Docs.
03

Add content & wait for processing

WebChat AI extracts, cleans, chunks, and vectorizes your material.

Depending on your chosen mode:

  • Website mode: Enter your URL (e.g. https://docs.example.com). WebChat AI automatically crawls your pages, stripping out navigation headers, footers, and scripts.
  • Documents mode: Enter an assistant name. Open Knowledge Base and upload up to 5 files per batch (.pdf, .docx, .md, .txt; max 10 MB per file).

Document Processing Lifecycle

pending→processing→ready

Documents are split into 500–800 token chunks with 100-token overlap to preserve semantic context. Once the status reaches ready, your knowledge base is searchable.

04

Customize appearance & branding

Style the widget to match your brand identity.

Open Widget → Appearance in the dashboard. You have full control over:

  • Theme preset: 11 curated palettes (Classic, WhatsApp Classic, iOS Native, Enterprise Slate, Ocean Blue, Midnight Dark, Emerald Support, Purple AI, Minimal White, Sunset, Modern Gradient).
  • Typography: 10 font choices (System default, Inter, Poppins, Nunito, Roboto, Open Sans, Montserrat, Lato, Playfair Display, Space Grotesk).
  • Bot identity: Custom bot name, online presence text, avatar image URL, and header logo.
  • Suggested questions: Up to 5 quick-prompt chips to guide new visitors.
05

Test the assistant in staging

Verify answers, streaming, and citations before public launch.

Navigate to Widget Test in the dashboard sidebar. This runs the exact live widget SDK inside an isolated test environment.
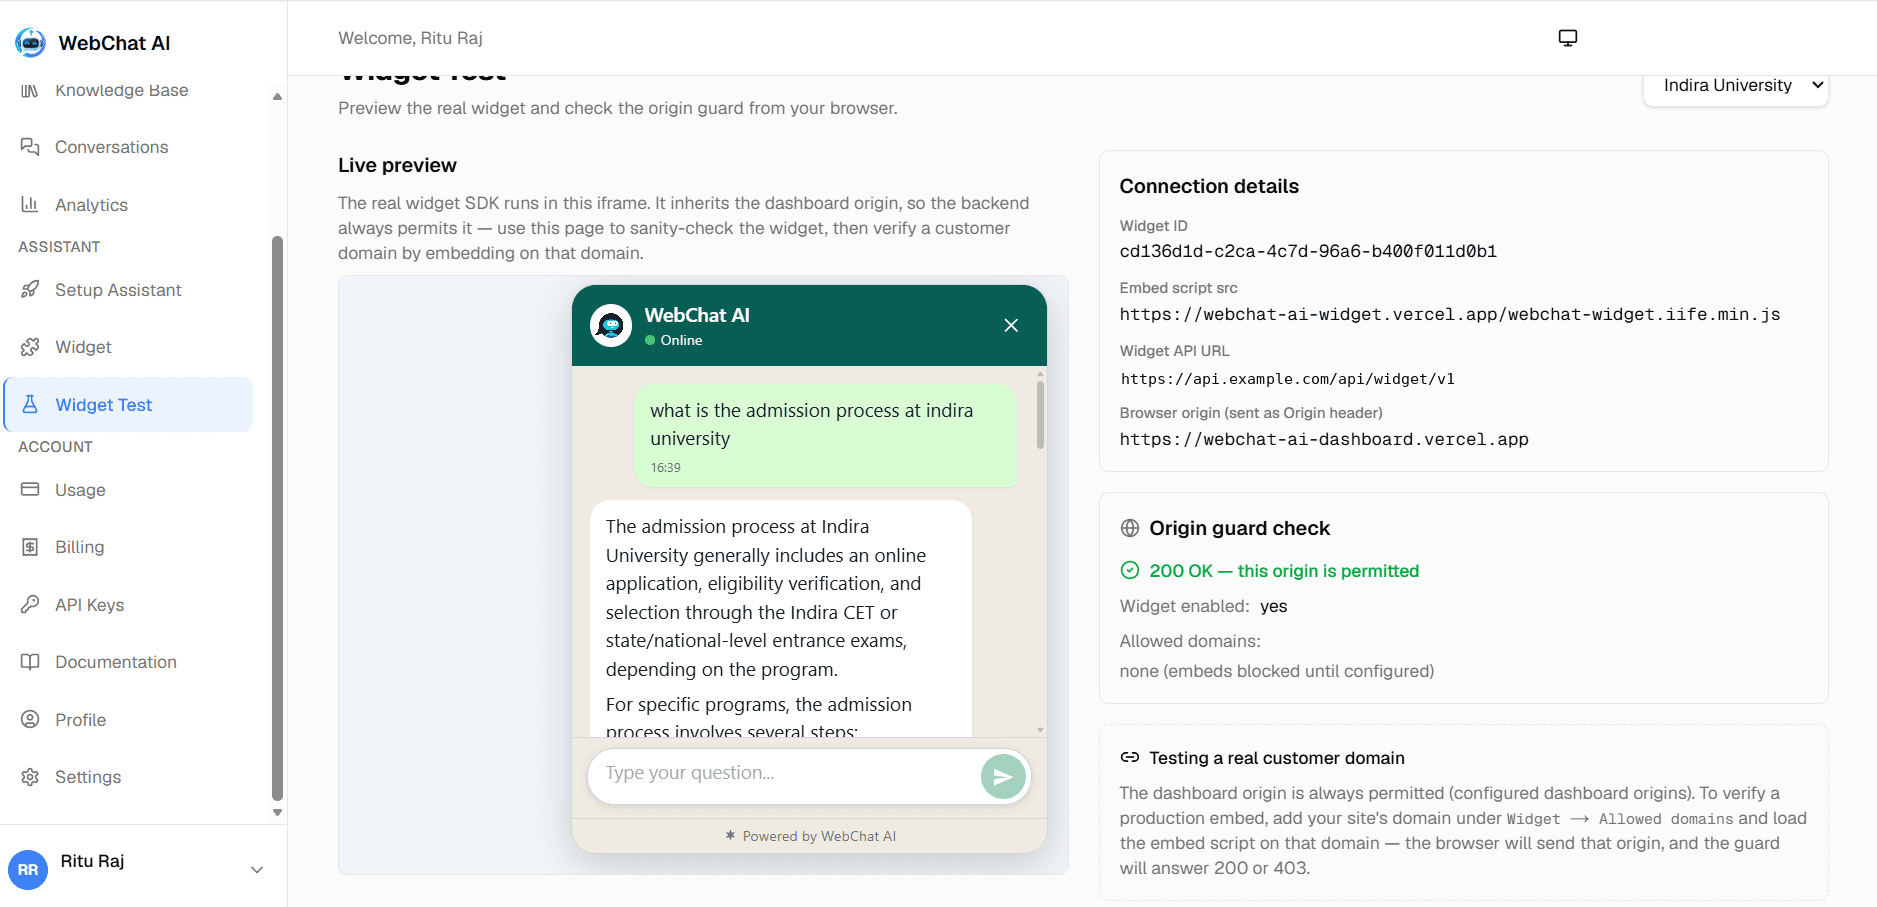
Dashboard Widget Test Page
The Widget Test environment lets you verify live streaming responses and citation accuracy.

Verification Checklist

  • Widget launcher button opens and closes smoothly
  • Welcome message and suggested questions appear on start
  • Submitting a question streams the response in real time
  • Citations link back to the exact source documents or URLs
  • Unanswered questions gracefully trigger the fallback response without hallucinating
06

Configure domain allowlist & embed

Secure your widget against unauthorized embedding.

Under Widget → Allowed domains, enter the hostnames permitted to embed your widget (e.g. example.com or *.example.com). Requests from unlisted origins will receive an HTTP 403 Forbidden.

Copy your embed script from Widget → Embed code and paste it before the closing </body> tag of your website:

index.htmlhtml
<script src="https://webchat-ai-widget.vercel.app/webchat-widget.iife.min.js" data-widget-id="YOUR_WIDGET_ID" defer></script>

Config caching notice

Public widget configuration is cached server-side in Redis for up to 300 seconds (5 minutes) with best-effort invalidation upon dashboard updates.
07

Monitor conversations & analytics

Inspect visitor interactions and track AI performance.

Once your widget is live on your website, visit the dashboard to review operations:

  • Conversations: Inspect full message transcripts, citations used by the AI, and per-stage latency (embedding, retrieval, generation).
  • Analytics: Review conversation volume, peak activity hours, top visitor questions, and thumbs up/down satisfaction ratings.
  • Usage: Track message counts and document storage against your monthly subscription tier.

Related documentation

Knowledge Sources Guide

Deep dive into website crawls, uploaded documents, and mixed ingestion.

Read guide

File Upload Limits & Processing

Learn supported file formats, character limits, and chunking parameters.

Read guide

Widget Customization

Explore all 11 theme presets, 10 curated fonts, and branding options.

Read guide

Troubleshooting Guide

Diagnose allowlist 403 errors, CSP directives, and crawler issues.

Read guide

PreviousOverviewNext Knowledge sources

Ready to build?

Register a website and get a live assistant in minutes.

Get Started Free